|
HOME
Introduction
Design
Stands and Blocks
Shaping
Polystyrene
Epoxy
Glassing
Hot coat
Fins
Sanding
Art Work
Gloss Coat
Leash Plug
Books
Material Lists
Resin Amounts
Equipment List
Misconceptions
Tips
Sm Wave Design
Research
Videos
Helpful Links
This is your site. It is not biased
by any direct advertising and no money is accepted for any links shown.
It is made for you and supported by you.
PLEASE DONATE!
HALL OF FAME
~~~~~~~~~~~~~~~
Thanks to the users below
for keeping this site alive and unbiased with their donations.
Mark Sadler
Kevin Kuzma
Mark Griffith
Kirra Oredson
Logan Leitch
Joyce Shingler
Alex Bayer
Greg Bayer
Ian Pirsch
David Shell
Fab Ordonez
Tom Walczewski
Anthony Rynicke
Peter Young
Lori Hartline
Terence Harper
Robert Campbell
Thomas Gustafson
Michael Filanowski
John Gaudette
Philip Meagher
Russell Simms
Randall Kirkpatrick
Calvin Arnold
Preston Renbarger
Mark Schreiter
Mike Sheldrake
Ritchie Ginther
George Young
Michael Simbulan
Bradley Saviello
Poolguy Network
Elan Yaari
Mathieu Corbeil
Sergey Terentev
Anthony Azcona
Hamish Eassie
David Merga
Spencer Ward
.
|
GLASSING
Most people say the first laminate coat was the hardest part of
building their first board. Please - double please - practice.
Get some scrap foam, cloth, and resin, and practice laminating -
especially wrapping the rails.
Do not cut weight by reducing cloth amounts.
I recommend buying supplies online from one of the sources listed
in the HELPFUL LINKS. It is generally cheaper and easier overall
to have the recommended supplies delivered directly to your door,
from one or two sources, compared to driving to numerous sources.
Buying locally often results in problems caused by insufficient
or substandard materials. If you try to build a surfboard
using the abbreviated advice of a local surf shop you are courting
disaster. I have had good experiences with all the companies
referred to in HELPFUL LINKS. www.fiberglasssupply.com
has everything needed to do an entire board, in many combinations.
This web site also has a lot of information about the products which
will help you decide which one to use. www.surfsource.net
is also very good and a little faster. As of 2010, a number of us
have switched to www.uscomposites.com
for supplies - they are generally cheaper, especially the epoxy.
Note: I do not receive any compensation for recommending anything
in this guide.
Most surfboards have three resin layers covering the foam core;
first the laminate coat (cloth saturating layer), second the hot
coat, and third the gloss coat. Most surfboards are built
with a clear polyester resin and fiberglass cloth (Silmar 249 resin
and "E" cloth). This combination can produce a good,
economical, time proven board. Most short boards are made
with 4oz "E" cloth - one layer on the bottom and two on
the top. Most longboards are made the same way with
6oz cloth. This is a marginal amount of cloth for longboards,
and not enough cloth for a shortboard. The durability problem
of the thruster can be solved by simply using "S" cloth
(with no increase in weight). Many professional board builders
complain about the "disposable board" attitude which is
now so accepted.
The following products have merit, but please simply follow the
recommendations, as you will have fewer problems. Please avoid the
following on your first board:
- Carbon fiber cloth.
- U.V. activated catalyst (sun cure)
- Isophthalic resin.
- Vinyl ester resin.
- Additive F (epoxy thinner - xylene)
Do not use less than 6 oz. "E" with a deck patch for
any 2 - 3 lb/cu.ft. foam. There are better ways to cut weight.
Try the following alternatives:
- Thinner, and/or lighter stringer (spruce, cedar, etc.).
- Epoxy glue joint in place of stringer.
- No stringer.
- Foam filled, hollow, cedar, or molded fin(s).
- Polystyrene foam.
- No gloss coat.
- Epoxy and "S" cloth.
The following will greatly help on the first lamination.
Make a small replica of a surfboard blank with some scrap foam (maybe
1/10 scale). Practice laminating the replica as if it was
the real thing (especially wrapping the rails). Simply follow
the directions below in miniature. Cut a plastic squeegee
down to 1/10 scale. Also; a small, scrap, full thickness
piece (with a rail shaped) is very helpful for practicing wrapping
the rails. Most first time builders say that glassing was
harder than shaping. Practice.
See MATERIAL LISTS for amounts. Adjust the amounts for each
board. These amounts are barely enough for a 9' board using
the cloth below. For a 10' board add at least 10% more of
everything. For a 8' board subtract 10%.
The following instructions assume the use of an extruded or expanded
polystyrene foam blank (2lb./cu.ft.) with one layer of 8oz. "E"
cloth on the bottom and top, with an 8oz "E" cloth deck
patch (all plain weave). Epoxy will be used to saturate the
cloth (same basic tehnique with polyester). Do not use polyester
resin directly over polystyrene foam. See epoxy. This
layering method will produce a very durable board which is more
resistant to damage in the areas it is most likely to occur - the
deck.
Use old clothes - these will be ruined. Keep using these
same clothes. Long sleeves help. Cheap sandals with old socks
help. Cover the floor under the board with roofing felt (at
least two widths). Do the following:
- Put the blank on the racks/stands bottom up.
- Blow or brush off any dust etc. Make sure it is ready.
- Roll 1 layer of 8oz cloth over the entire surface of the blank
overhanging the ends and sides by at least an inch.
- Holding the roll over the end with one hand, cut the end with
at least a 1" overhang with your scissors in the other hand.
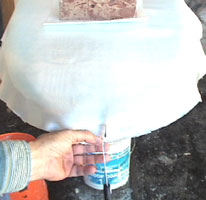
- Put weights (3 bricks etc. on paper towels) on the cloth to
keep it from shifting as you cut.
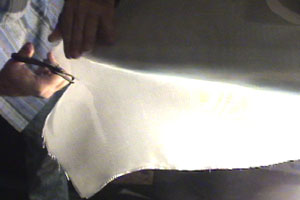
- Cut this layer very straight so it will overhang the center
or shadow of the rail by about 1" all around. This
is called free lapping. See photos below.

When cutting the 1" overhang it helps greatly to have a moveable
light shining from underneath the board towards the area you are
cutting - use a clamp light on a bucket. Cut a slit (see
photo below) in the cloth hanging at the nose tip and tail corners.
These slits will keep the cloth from wrinkling at these points.
Most shops use a different lapping method called cut lapping.
It is prone to devastating errors for first time builders.
It is necessary only if you insist on different cloth saturated
resin colors on the top and bottom, (not recommended).
A big mistake at this stage can be board ruining, so heed the
following. Make sure you have a little more of everything
than you think you need (esp. resin and hardener). Make
double sure you mix a number of small but proportional test batches
of catalyzed resin. Try to make the resin gel in about 30
minutes on your first laminate (cloth saturation). Refer
to the RESIN AMOUNTS section (this should help you with the epoxy
mixtures). When using epoxy, if it is hotter than 80 degrees you may need to
refrigerate the resin and hardener. At 60 degrees you will
need a heater. If you are using polyester please use .75% catalyst ratio (less than one per cent) Before you mix in the hardener/catalyst stop and think,
what have I forgotten? What might I need in a hurry if it
sets up faster than I want? Have resin, hardener, and graduated
mixing cup easily available, and the mix ratio already figured
- in case a small amount of extra resin is needed. Do the
glassing in a garage/shed etc., if possible. If done outside
try to stay out of direct sunlight (unless it is cool).
Do not even think about lifting the cloth after it is wet. Do
not attempt to copy a professional glasser seen anywhere.
- Please read the warning label on the resin container and put
on a respirator with vapor cartridge, and gloves. If not
using a respirator, at least turn on a fan or get in the wind.
- Mix the epoxy and hardener (see materials list-resin amounts).
Use a mixing container with ounce markings. I repeat, test
it first. You need at least 30 minutes to do your first lamination (more time is better). Please do not start an epoxy
lamination with the room temperature above 80 degrees or below
60 degrees (it is ok to start at 80 degrees, in the morning, with
the temperature rising). Please do not put more than !% catalyst in polyester resin.
- Mix it quickly for about three minutes, taking extra care to
thoroughly mix the thick epoxy resin which sticks to the mixing
cup walls and bottom.
- Pour the resin as in Figure 15 - do not allow your resin to
run off the nose on to the floor.
Figure 15
Pour about 3/4 of the total mixed resin. Save the rest for dry
spots.
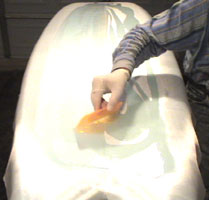
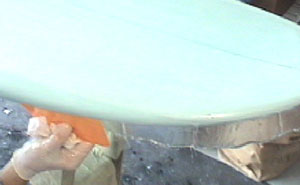
- Working quickly now hold your 4" squeegee at about a 45
degree angle. Run it lightly longwise forcing the pooled
resin out towards the rails as shown in photo below. Keep quickly,
and lightly dragging the resin with your squeegee from overly
wet areas to overly dry areas. Do not let small unevenly
saturated areas delay you. Saturate the flats as fast as you can
without pushing resin off the rails onto the floor.
- Start pouring the 1/4 resin left in the container, in a thin
line, along the rail edge about 1' - 2' at a time.
- Start dragging this resin with your squeegee so that it will
run as evenly as possible down the overhang. Put a hand
underneath the overhanging cloth edge. Lift it slightly and daub
resin on the cloth with the squeegee (evening the resin saturation
and keeping it from running on to the floor). Try to catch
any excess runoff in the container. Don't worry about drips.
Do not be delayed by small dry spots. The 4"
plastic squeegee can be dipped in the remaining resin (about 1"
deep). The resin on the squeegee can be used to saturate uneven
spots. Hurry...the rails must be wrapped before the resin
gels.

Long threads may be hanging down in a few places at this stage.
Cut them with scissors if time allows. If possible, a helper
can monitor the resin by telling you if it thickens (The resin
on the board will gel a few minutes after the resin in the container,
giving you a little time to finish very quickly).
- Quickly, using very firm pressure, (this almost can not be
done too forcefully, just don't make the cloth or blank shift)
drag any excess resin out of the cloth (the squeegee should be
bending). Do this by dragging the squeegee crosswise from
the stringer to the mid rail all around the board leaving the
cloth hanging. If there are any dry spots on the overhang,
use the excess resin, (which will accumulate on the squeegee)
to wet these spots. This accumulation can also be scraped
off on the top edge of the container, to be used on other touch
ups. Resin may be dripping everywhere.
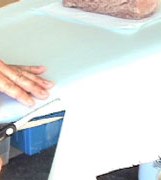
- Quickly, still using very firm pressure, starting mid rail,
lap the cloth underneath working from the middle towards the nose,
on each side, then the middle towards the tail on each side.
Do this by starting the squeegee at mid rail and firmly force
the wet cloth to adhere to the underside curve of the rails -
the squeegee should bend slightly (see photo below).
- Look at the light reflection on the surface of the cloth.
If resin is pooled in an area, drag it to the edge of the cloth
and scrap it off the squeegee into the container. The squeegee
should make a zipper type sound when dragged quickly over the
surface of the cloth. The weave of the cloth should be visible.
Any pooled resin will make the board weaker (floating bond) and
heavier.
- Cut anything hanging down and check for bubbles, especially
on the rails.
- Drip a little resin in the bubbles and work them towards the
edge of the cloth with the squeegee. If this doesn't work
cut a small slit with a razor blade, drip a little resin, and
work the bubble out of the slit with a squeegee. If there
is a little cloth sticking up at the tail corners and nose tip,
drip some resin, squeegee, and stop. These areas will never be
perfect at this stage. Fix them on the hot and gloss coats.
- After taking off the gloves, get a flashlight, and check the
cloth on the bottom for bubbles, dry spots, and drips.
If laminating extruded polystyrene and the blank is rough sanded
as advised, do the following: After the rails are wrapped,
spread about 5 - 10% more resin over the cloth. Try to fill
in all the pits and scratches, but do not leave any pooled resin.
This will make it look better, (fewer bubbles) and will lessen delaminations.
Put on new gloves and clean out the resin in the container with
a paper towel etc., or pry it out when it gets semi-hard (do this
every mix). I added 1 extra container in each size, in the
MATERIALS chapter because most people ruin one on their
first board. Use cheap scissors (dollar stores) and 4"
plastic squeegees which can be thrown away. It can cost more
to clean them than it does to use a new one each time. If
you must re-use things try cleaning them with 90 - 100% isopropyl
alcohol (found at drug stores).
The epoxies recommended will probably take 6 hours or more to be
ready to turn - when the laminate is tapped with a fingernail, and
it clicks, it is ready to sand/plane. Turn the blank top up.
With a surform file, plane any uneven places paying special attention
to nose end, tail corners, and where the cloth meets the foam etc.
The area where the cloth meets the foam is called the lap line. Use
a surform pocket plane, #50 block sander, and #50 hand sand paper
to reduce the lap line edge almost flat with the foam (do not sand
into the foam). It is much safer to leave a slight edge at
the lap line (about the depth of your fingernail). I highly recommend
putting a layer of duct tape around the entire circumference, around
the lap line(foam side). See SANDING - photo of duct tape.
The duct tape will prevent you from damaging the foam. Do
not obsess over the somewhat uneven cloth edge. This edge
will be invisible, or almost invisible, after the next cloth layer
is laminated. The lumps, drips, and lap line edge are more
easily removed if done before the resin is completely hard (consistency
of hard rubber). If the surform or the sandpaper clogs, the
resin needs more time to harden. Remove any clogged resin
from the surform with a wire brush, or small screwdriver etc.
To glass the top, do the following:
- Roll 1-8oz. "deck patch" layer from the tail to 1'
beyond the board center point. See Figure 16a.
- Cut the deck patch cloth at an angle to the stringer (if cut
straight it will tend to break on the line). Mark your angle line
by lightly scratching a line on the cloth with the tip of your
scissors - do not use a marker. Put weights (3 bricks etc. on
paper towels) on the cloth as you cut it to keep it from shifting.
- Cut the deck patch overhang at mid rail. See photo below
drawing 16a. Keep the scissors lightly touching the mid
rail at ninety degrees to the floor.
Figure 16a
- Roll 1 layer of 8oz cloth over the entire surface of the blank
overhanging the ends and sides by at least an inch - this will
cover the deck patch and remaining exposed foam.
- Holding the roll over the end with one hand, cut the end with
at least a 1" overhang with your scissors in the other hand.
- Put weights (3 bricks etc. on paper towels) on the cloth as
you cut it to keep it from shifting.
- Cut this layer very straight so it will overhang the center
or shadow of the rail by about 1" all around. See photos
above - first three photos. Note: the deck patch is cut at mid
rail and the layer covering it is cut 1" longer - both are
saturated at the same time. When cutting the 1" overhang
use a moveable light shining from underneath the board towards
the area you are cutting (clamp on light to bucket). Cut
a slit in the cloth hanging at the nose tip and tail corners.
- Saturate the top like the bottom, adding about 10% more resin.
- When your fingernail clicks on the newly hardened surface,
plane/sand the new lap line and any drips and uneven spots (esp.
nose tip and tail corners).
Please do not cut weight by reducing cloth amounts.
Most people say the first laminate coat was the hardest part of
building their first board. Please- double please - practice.
Get some scrap foam, cloth, and resin, and practice laminating -
especially wrapping the rails.
[Next] |
|
|